In my home studio setup I have the option to display photographs live on a big TV screen. This is called tethered shooting. I will explain how I link up my Canon 6D, with WiFi, to the TV screen. This is a technical article, but I hope this may be useful to people trying to achieve a similar thing.
First, there is an alternative: Lightroom; it is supposed to support tethered shooting from a lot of cameras directly. I have never tried it though and chose my own setup for a few reasons: I don’t want to depend on Lightroom, I want to always see a fullscreen image, and I want to be able to add some special effects, such as presenting in black & white immediately. I will describe here how I got it working.
Hardware
The hardware that I use is this:
- A Canon 6D.
- A WiFi network.
- A laptop running Windows (Windows 7 in this case, but Windows 10 should work the same).
- A television, which is connected to the laptop’s HDMI output.
Software
The software flow that I use is this:
- WiFi is enabled on the 6D, which makes a connection between the camera and laptop. There are other articles on the internet which describe how to connect the 6D to an existing WiFi network.
- The Canon 6D takes a picture.
- The camera sends this picture towards Canon’s EOS Utility.
- EOS Utility detects this and starts ‘external software’, which is my own software, ViewImage.
- ViewImage then displays the new photo, resizing upto fullscreen, and optionally immediately presenting it in black & white.
Let’s go over these steps in more detail. The 6D connects to an existing WiFi network. How to do that is described in other articles on the internet. The camera can function as an access point itself, which is the ‘Camera Access Point’ feature. I have it in Infrastructure mode, so it connects to my existing WiFi network. This has the advantage that the laptop can connect to the internet through its regular WiFi connection; I use that to play music during the shoot, connecting to Spotify for example. And I wonder if the Camera Access Point doesn’t unnecessarily drain the battery of the 6D.
Then I take a picture. I usually take RAW pictures, but for this setup I also save an added JPEG image. You can specify this in the camera’s menu; the first tab, then ‘Image Quality’. I usually have it at M-RAW+S2 or S3. S3 is the smallest JPEG variant at 720×480 pixels, and is nice and quick for the WiFi connection, and still looks ok on a FullHD (1920×1080 pixels) TV screen.
Canon EOS Utility
I have paired the camera with Canon EOS Utility. There are three versions of EOS Utility; I used version 2, but I also got version 3 to work. The first version is very old, but version 2 and 3 (the latest version was v3.5.10 at the time of writing) can be used.
The camera’s WiFi settings I use:
- Communication mode: Remote control (EOS Utility)
- Infrastructure (connect to existing network)
- IP address: auto assign (this depends a bit on your network but is generally what you want).
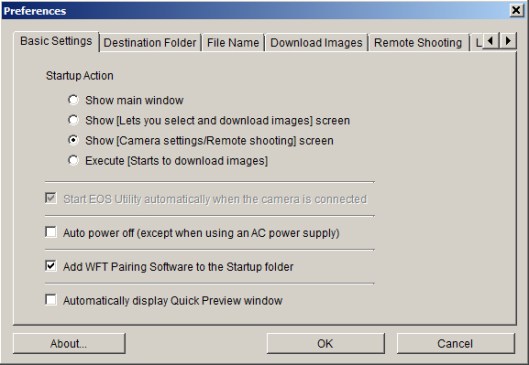
Then it’s important to let EOS Utility grab your photos as they come in. Let’s go over the settings in detail. The basic settings make sure the Utility starts in ‘Remote shooting’ mode as you turn on the camera and make a connection with the laptop (after having paired camera to laptop, the utility should start automatically when turning on your camera). To make sure that the camera is seen, I have checked the ‘Add WFT Pairing Software to the Startup folder’option.
Next is the Destination Folder. I store my temporary shoot images in c:\dump\fotos. Note that these are just temporary JPEG files; the real images are stored in RAW on the camera. So it doesn’t really matter if you lose the images in c:\dump\fotos.
The image shows that I have checked the ‘Download images’ option, so that new images get transferred from the 6D to the laptop. I don’t think the other options do anything in this setup, because of the upcoming options in the ‘File Name’ tab.

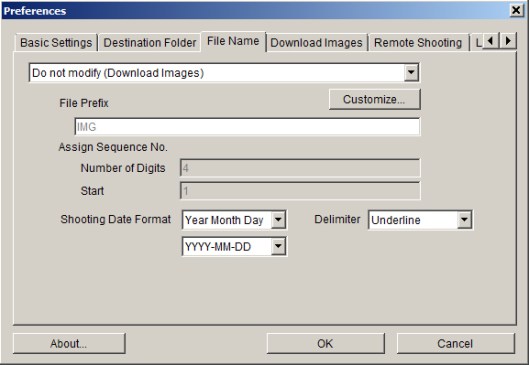
Next is the filename converter; I have this turned off (‘Do not modify’).
Then, I choose to download images that have not yet been downloaded, to avoid EOS Utility transferring all images that are already on the camera (which may be plenty).

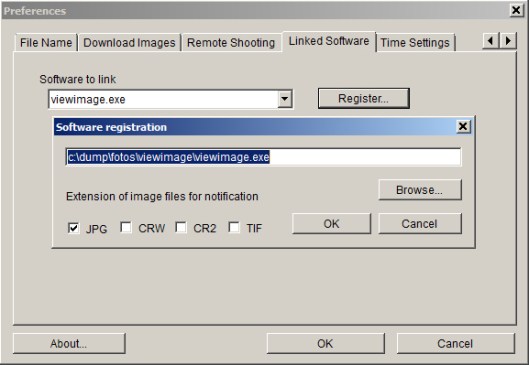
The next tab is very important and contains the link to my own displaying software. It’s not a standard piece of software so you have to click ‘Register’ and fill in these details. I have put my software in c:\dump\fotos\viewimage\. Notice that ‘JPG’ is checked, so viewimage.exe will be started with every new .jpg file.
Then an important one; in the Remote Shooting tab: in EOS Utility v2 you have the option ‘In RAW+JPEG mode, only transfer JPEGs to the computer’. This needs to be on to avoid sending RAW files over WiFi. If your WiFi is fast enough, by all means, go ahead and transfer both, as this automatically makes a backup of your photos. But in my case, it is far too slow and needs to be as shown below:

If you have version 3 of the EOS Utility, this option is removed and put in a different location. When the camera is connected, click in the area indicated by the red circle to do the same thing. Select ‘Computer and memory card’ and check the ‘only transfer JPEGs to the computer’.

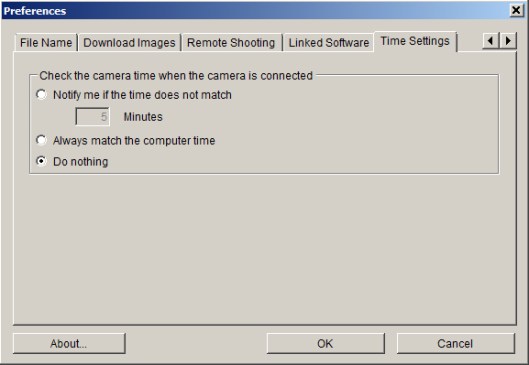
The time settings here are probably irrelevant, but shown for completeness.
Then the next step is ViewImage.
ViewImage
ViewImage is software I wrote especially for this purpose. I wanted to display the images fullscreen, and optionally in black and white. I googled around quite a lot, which makes you end up at using a Windows & Fax Viewer DLL for example. The problem there is that the image was never rescaled to fit the entire screen, and that there was not much control.
I have uploaded a full installation of ViewImage at http://kodakmomentje.com/download/viewimage.zip . Just unzip it in c:\dump\fotos\viewimage\ for example, as I have done.
Configuration can be done by editing the viewimage.ini file with something like Notepad. The useful settings are:
- resolution.width and resolution.height; these determine the window size. If you have a FullHD screen, set these to 1920 and 1080 respectively, for example.
- resolution.fullscreen; if set to 1, the window will try to take over the entire screen. This is what I use during shoots.
- app.startup_directory; the directory in which your photos are dumped by Canon EOS Utility. If you used my directory setup, c:\dump\fotos\, there is nothing you need to do.
Live Control
Now everything should be set up. During the shoot, when turning on the camera, Canon EOS Utility should appear (it may take a while). When taking a picture, ViewImage should come up and display it. When taking another picture, ViewImage will show the new image.
There are some keyboard shortcuts you can use in ViewImage:
- C – show the image in color
- B – show the image in black & white
- I – toggle the info on the image
- Left/right – walk through the images in the directory.
- ESC – quit ViewImage.
What I often do is take some pictures and just let it roll. You can review images by scrolling back a bit by pressing the Left cursor key. When taking a new image this new one will automatically take over again.
Conclusion
I spent a lot of time before I had a nicely working setup, so I hope this article will help others into creating a useful tethered setup for their situation.
I may have skimmed over the pairing details a little bit too fast; I may elaborate on that later.